
When we moved into our home three years ago we found some old doors in the rafters of the garage. I used two of them for this project last year:
 Well, I finally got around to using another one of the old doors! I have seen old doors made into tables on various different blogs like this one. I also found an article about making a picnic table out of an old door and two saw horses.
After my wonderful husband and father-in-law pulled the door out of the rafters I gave it a good cleaning. I liked the shabby-ness of the door so I decided not to paint it.
 I swear sometimes the thrift store gods decide to smile on me and I find just the thing I'm looking for. I was at the Deseret Industries and found four brand new table legs for $8. I was giddy! Anyway, I attached the legs to the door with "L" brackets (which cost like twice as much as my thrifted table legs).
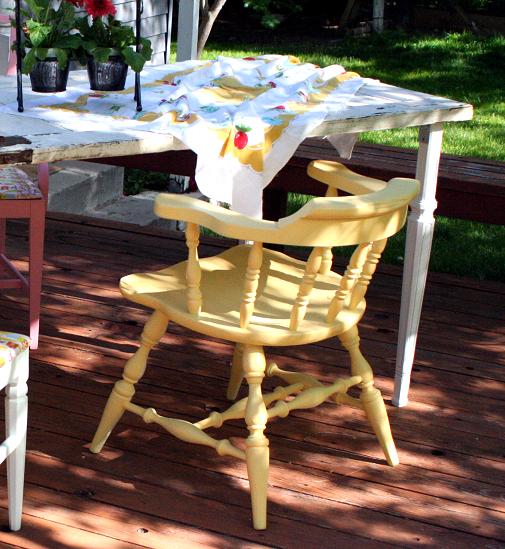
 After flipping the table right-side-up I learned one bracket is not enough to make the table really sturdy so I'm going to have to go back to the hardware store for some additional reinforcements. I found these four lovely chairs at the Deseret Industries (over a few different shopping trips).


 They are looking wonderful after a coat of paint and some recovered cushions. The fabric is from my favorite little quilt shop, Suppose. I then sprayed the chairs with a protective clear coat to hopefully protect them from the elements.


 I am in love with my new picnic table and can hardly wait to have lunch under the trees this summer!


 My curious little chickens wanted in on the action too.
 So what do you all think I should do to protect the top of the table? I'm sure someone out there has a good idea...

 Well, I finally got around to using another one of the old doors! I have seen old doors made into tables on various different blogs like this one. I also found an article about making a picnic table out of an old door and two saw horses.
After my wonderful husband and father-in-law pulled the door out of the rafters I gave it a good cleaning. I liked the shabby-ness of the door so I decided not to paint it.
 I swear sometimes the thrift store gods decide to smile on me and I find just the thing I'm looking for. I was at the Deseret Industries and found four brand new table legs for $8. I was giddy! Anyway, I attached the legs to the door with "L" brackets (which cost like twice as much as my thrifted table legs).
 After flipping the table right-side-up I learned one bracket is not enough to make the table really sturdy so I'm going to have to go back to the hardware store for some additional reinforcements. I found these four lovely chairs at the Deseret Industries (over a few different shopping trips).


 They are looking wonderful after a coat of paint and some recovered cushions. The fabric is from my favorite little quilt shop, Suppose. I then sprayed the chairs with a protective clear coat to hopefully protect them from the elements.


 I am in love with my new picnic table and can hardly wait to have lunch under the trees this summer!
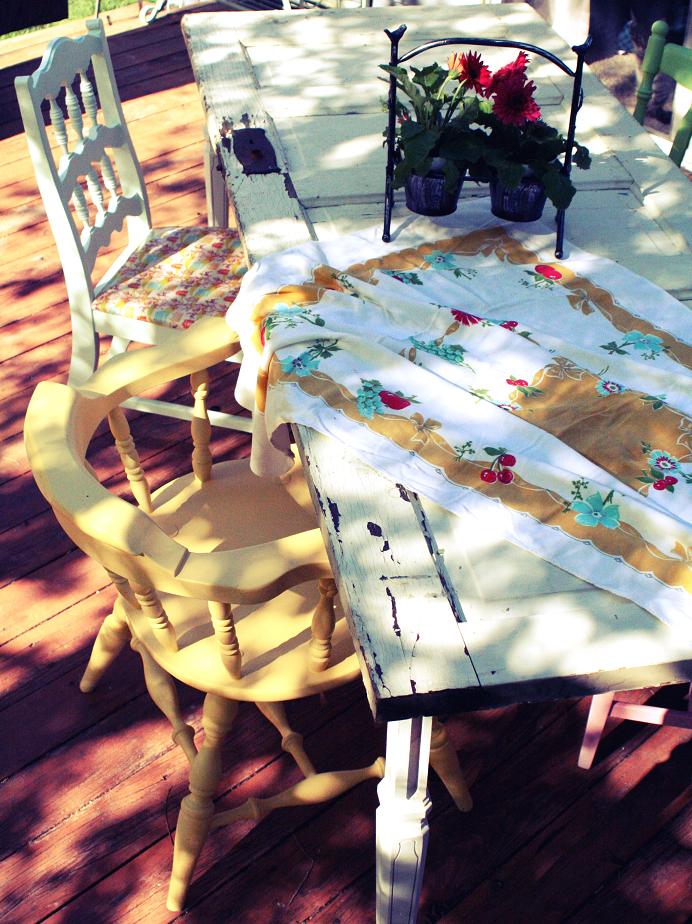

 My curious little chickens wanted in on the action too.
 So what do you all think I should do to protect the top of the table? I'm sure someone out there has a good idea...


